X
Claim your discount!

How do I restore outlook 2011 from Time Machine?

How do I restore outlook 2011  from Time Machine?

Apple Mail, as well as Contacts, includes advanced support for Time Machine. This means that you can go back in time to search for a particular e-mail message or contact card without having to worry about where the file is actually stored.

Our Macs contain important information, both for our private and professional lives. That’s why Time Machine makes life easy for us: the software to backup our data is integrated into every Mac, ready to solve our problems in case of need.

Apple has really thought of everything, trying to make the data recovery experience as traumatic as possible. Because often we don’t notice the utility of Time Machine, if not when we need it: if for example, we have to restore files, or go back to a previous backup, perhaps because we have updated our Mac to the latest version of macOS and we have found some errors.

Without delay then we immediately see how to restore our data using Time Machine backups.

How to restore outlook 2011 from time machine using Time Machine backup

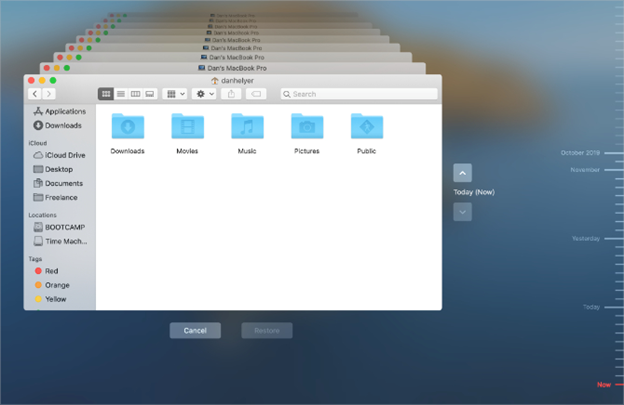
It often happens to delete only one file or folder by mistake, perhaps because we are distracted and we do not realize that we have completely deleted its contents. Or we really need that document which we thought was unnecessary, and which we have now canceled for more than two weeks.

If you make backups on Time Machine on a regular basis, you can recover files, individuals or groups, easily.

  • We open the document we want to recover, or we go to the position where it was when we deleted it with the Finder app.
  • We open Time Machine from applications: we can use Spotlight search to do it, or select Time Machine from the menu at the top.
  •  
How do I restore outlook 2011  from Time Machine?
  • Inside Time Machine we will find all previous versions of the document or folder. Using the side arrows we can scroll up or down, to go to older backups.
How do I restore mac outlook 2011  from Time Machine?
  • We choose the file we want to restore and press Space to preview it.
  • If we are sure it is the correct version, click on Restore.
  •  

How do I restore mac outlook 2011 from Time Machine?

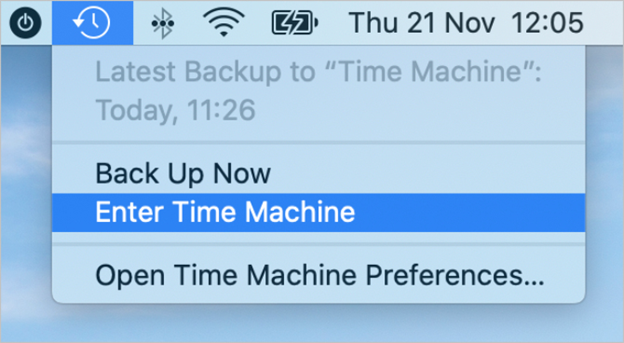
Sometimes we have combined something more drastic, for example by accidentally deleting many documents, or we have made many system changes.

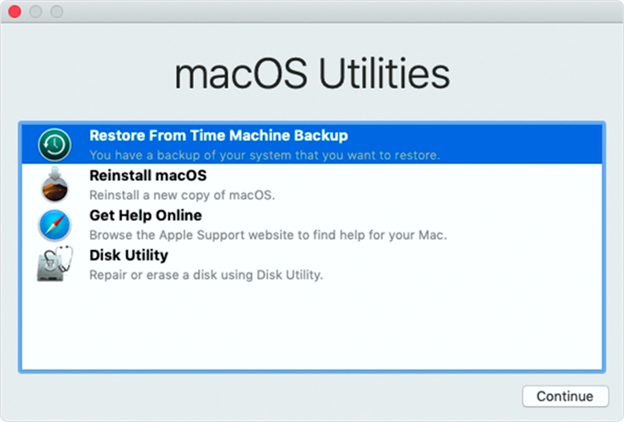
Worse, we may have updated to a new version of macOS, only to find out that the application we use the most is not yet compatible, because the developers have not yet updated it: what to do in these cases?

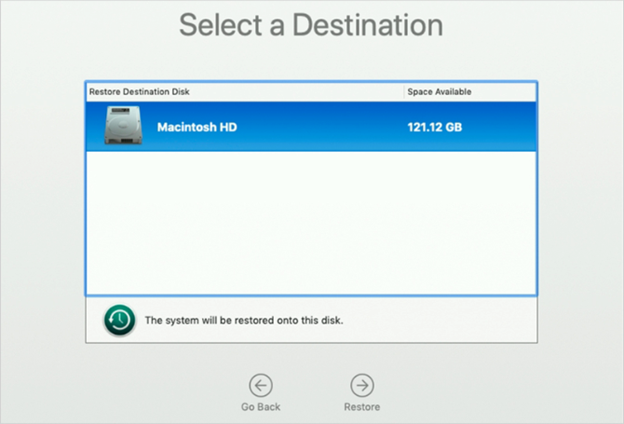
The best solution is to restore everything from a backup made with Time Machine . To do this we must perform the operation from macOS Recovery, a hidden partition that we can use to reinstall macOS, repair or delete the contents of our hard disk and finally restore a complete Time Machine backup.

  • We boot into macOS Recovery: to do this we turn off our Mac, then turn it on while holding down the Cmd and R keys simultaneously. A screen should appear, followed by the macOS utility window.
  • If the operation fails, it may be necessary to change the key combination and use Cmd + Option + R while turning on the Mac
how to restore outlook 2011 from time machine
  • Once we have the macOS utility window in front of us, click on Restore from Backup Time Machine, and select our hard disk.
 restore outlook 2011  from Time Machine
  • We follow the instructions, choosing the date and time of the backup that we want to restore, and then we choose our hard disk as the destination. When we are sure of the backup chosen, we click on Restore.
  • Depending on the size of our disk and the backup, it may take several minutes: even if the progress seems to stop, let your Mac work.
  • Once the process has finished, your Mac should be back at the same time you backed up.

How to move files or accounts to another Mac with Time Machine

With Migration Assistant, we can copy all documents, apps, user accounts, and settings to a new Mac from another computer or Mac.

  • We open Migration Assistant: we find it in the Utility subfolder, in Applications, or by searching for it through the Spotlight search.
  • When asked how to transfer information, we can choose between three options: from a Mac, Time Machine backup, or boot disk, from a Windows PC or another Mac.
  • We choose the first option and click on Continue.
  • We choose the backup drive and date/time of the same that we want to use to extract our files.
  • We choose which data to transfer using the Migration Assistant: applications, computer and system settings, documents, and files, including user folders.
  • Finally, click on Continue and wait for the operation to be completed.
  •  

Time Machine backup troubleshooting

It may happen that the procedure does not go exactly as expected: sometimes Time Machine, for example, cannot find a valid backup. This happens because our Mac cannot communicate with the drive where our backup is kept.

If several minutes go by and Time Machine can’t find a valid backup to restore, here are some solutions you can try:

  • Update your Mac to the latest version of macOS: to do so go to System Preferences from the Apple menu, then click on Software Update to check for updates and then click on Update.
  • Extract and reconnect the backup drive to the Mac: Open the Finder and click on the eject icon near the drive containing our Time Machine backup, in the right part of the bar. We check that the connection, via USB or Thunderbolt, is in place and wait a few seconds before reconnecting the drive and trying again.
  • Restart your Mac: often the simple solution to most problems is the action you least think about. Before trying other more drastic solutions, let’s try to restart our Mac.

Why not delete Time Machine backups

It happens that, taken from the mania of having everything in order, we can think of eliminating the older Time Machine backups, perhaps because we have just restored one.

If space isn’t a problem for you, we strongly advise you not to manually delete Time Machine backups, for two reasons:

  • Older backups are automatically deleted to make room for new ones, without you having to do anything.
  • If you don’t delete backups the right way, they will get stuck in the Recycle Bin, taking up unnecessary space.

So let Time Machine do his duty, and get him to work in peace.