X

The most popular Microsoft Outlook email client is used worldwide. Even though Outlook is mainly used for email purposes, it also includes a contact manager, calendar, task manager, note taking, web browsing, and journal. So it contains all of your documents which are invaluable to you. As you have been working with Outlook for a long time, you have experienced various data loss situations. Even if you are using the latest version of Outlook you may suddenly lose one of your critical information which can end your career. To be sure, you need to backup Outlook items permanently. The next question is how you can save your profile.
There are so many reasons behind the most happening Outlook profile data loss, it is accidental deletion of email. Every day we have to delete some spam which is not necessary at this time an important mail can be deleted accidentally. Then, to avoid this, you can use this well-known tool to keep a continuous backup.
This manual is intended to guide and advise the user in the good performance of their activities, so it is intended to include the most important information and detailed.
Although Outlook periodically backs up its contents to the file Bakup.pst, we can make a copy whenever we want. This copy is convenient to save it on a disk other than where we have installed Outlook, because among other things we use to recover mail, address book, contacts, etc. in case of breakdown or having you reinstall it. The process to create or recover a backup is easy, and while we are offered several options, in this tutorial we will focus on creating a file .PST, that it is the one that allows us to perform this operation in a faster and more comfortable way.
This outlook backup instruction refers to the Outlook 2010 version, so while the process is the same, there may be some difference in the options if it in earlier versions of Outlook.
This tutorial is not valid for Outlook Express.
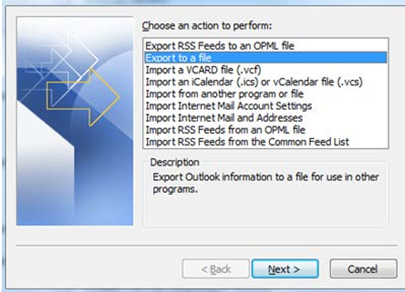
The process to export our information is done in five steps:
1. In the window that opens we choose the option we need, in this case
Export to a File. And we click on next >
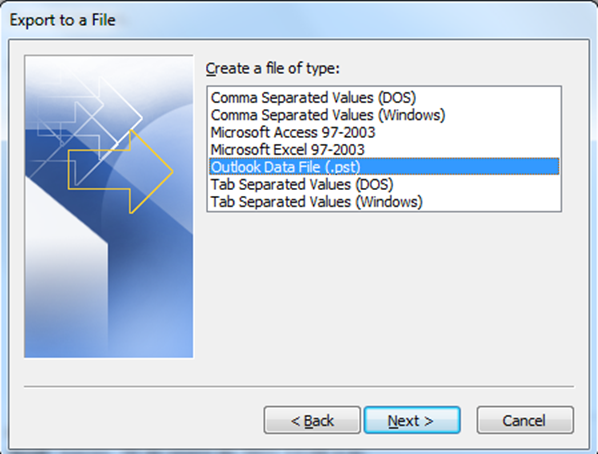
2. In the next window we choose the option Outlook data File (.pst file). And we click on
Next >
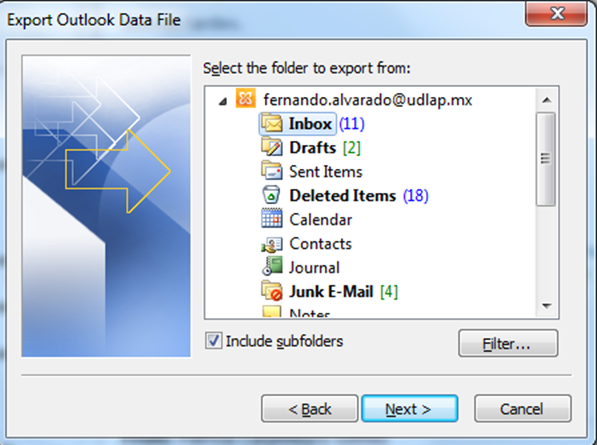
3. In Step 3 we choose the folders we want to export. They can be all or only any. We also choose whether to include the subfolders they contain. And click on next >
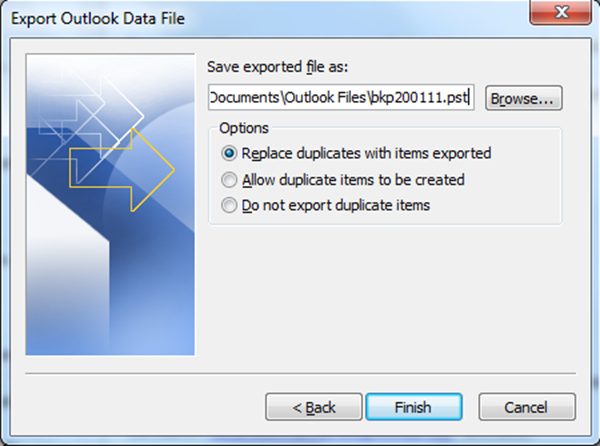
4. In this window we choose both the name and the destination of the file .pst to create. It is recommended that we put a reference to the name of the file when this endorsement was made, for example: “abcs.pst file”. So we will remember the last backup date. And we click Finish
In the same window, we have presented three options (in case you have already created the export file). These options are:
5. In Step 5 and last allows us to protect this file using a password. If we do not want to put a password to the file.
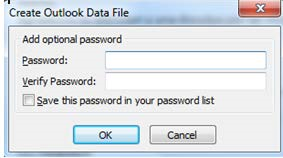
Note: it is not recommended to set a password as it can cause serious conflicts if the lose. We press the OK button and wait for the process to finish.
We’ve already created our file .pst that can serve us both as backup to copy this information to another computer.
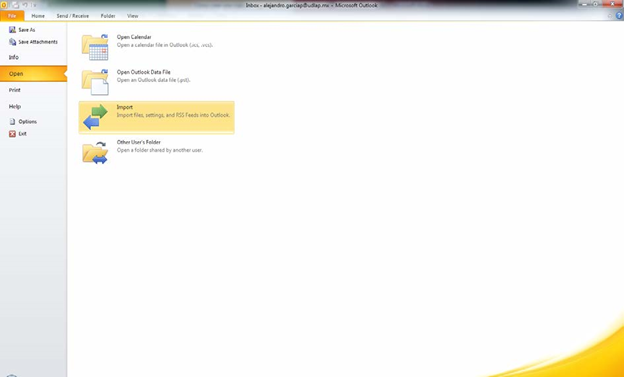
Import To begin with, as in the previous case, let’s go to File and choose the Open option we click on open Outlook Data File. The process of importing the data contained in a file .pst files are made in these easy step:
In the window shown, by default will open the folder where these are saved file “.pst ” there we will display the file we just created in this case ‘bkp200111”
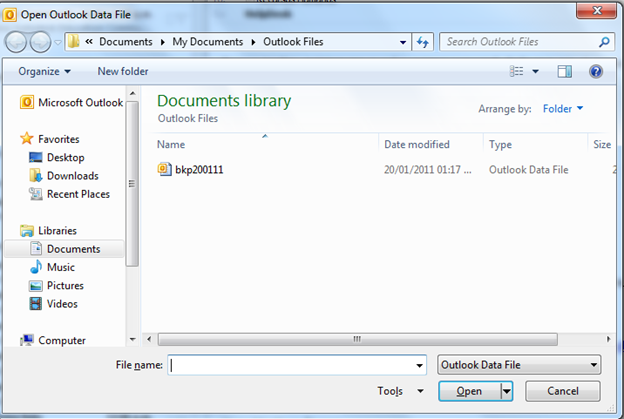
In this case all we have to do is select the file that we have created and click on Open.
Note: If the file we have created is not displayed within the folder you open by default, we must remember the address in which we saved this file, or search the file with the name we give it, so it is important to know the name and the
the location where we are storing this file.

It will be displayed as shown in the image with the name “bkp200111″” We’ll see th information we have selected, or where applicable the information we have stored.. This appears on the left side of Microsoft Office Outlook.
Step 1: Download and install the Mail Backup X app on your Mac.
Step 2: Once the installation is complete. Start Mail Backup X from the applications / Quick Start menu
Step 3: you can start running a fully functional 15-day trial or, if purchased, activate the app.
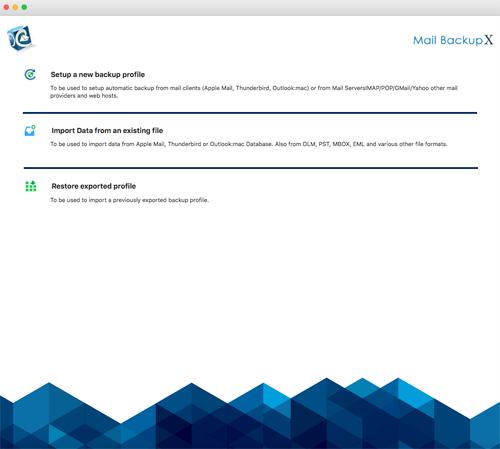
Step 4: you will be presented with an option to configure a new backup profile. Choose configure a new backup profile.
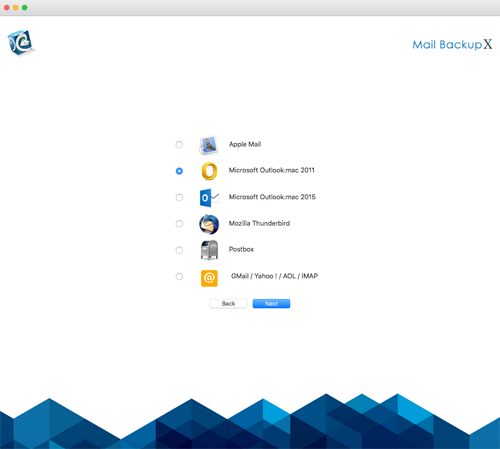
Step 5: you will be given with the mail clients option > choose Outlook Mac 2011 or Outlook Mac 2016 depending on the version you are using and continue with the next step.
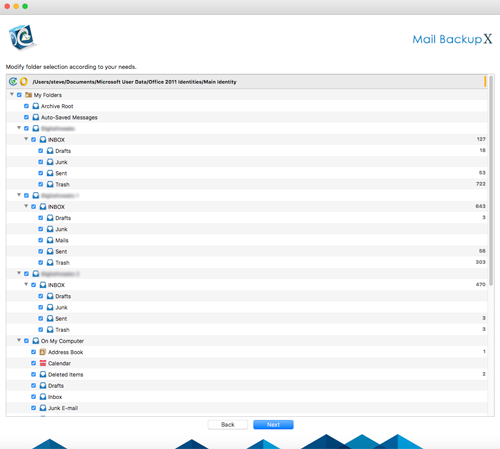
Step 6: you will be given with the folder structure of Outlook Mac 2011/2015 mail accounts. Select/deselect the folders you want to back up from Outlook Mac 2011/2015.
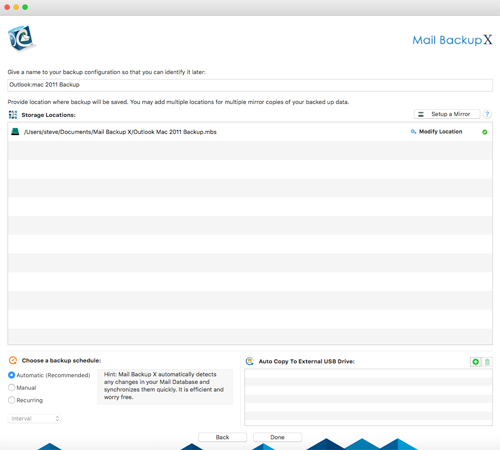
Step 7: You are now offered with advanced options such as mail backup frequency (select Automatic as recommended or you can choose the days and time frame for backup), you can also choose to add and configure Mirror locations for multiple backups for extra security. You can also turn on automatic USB synchronization. Therefore, each time you connect the USB drive, it automatically copies and synchronizes a copy of the local backup to the USB disk in the background automatically.
Step 8: The backup profile is configured and now your emails are configured to be backed up according to the options and settings you selected during the previous steps.
If you are using the Mail backup X tool to perform the outlook backup procedure, you will get the outlook backup instructions through the user interface. The tool is incredibly easy to use and can be used by anyone due to easy outlook backup steps.
Fortunately, you don’t have to learn outlook backup procedure if you choose the Mail backup X. The outlook backup steps are self-explanatory and everything in the process is guided from installation till the end results.
The most unique thing about the Mail backup X is that you can also convert your email files from one format to another. You get an inbuilt email converter within an email backup tool.
The Mail backup X enjoys 5 star ratings given by experts from around the world. You can follow these ratings to get an idea about the performance and results that the tool offers.
Yes, you can get the team edition of the Mail backup X and use it for 5 to 30 users. You get to backup 5 mail profiles per user. You can get 10 more mail profiles as a part of a top up.
“When I tried to backup outlook, I got scared that I did not know the outlook backup instructions. I checked out the Mail backup X since it did not ask me for any complex steps. To my surprise I was able to backup outlook folders without any unnecessary effort. I even set up a duplicate backup and got my backup in a PDF file. You should certainly try it for free.”- Dean Summers
“Everything was just so confusing to me. That is when I found the Mail backup X and realized that this is the new best thing in email management. I was suddenly able to backup and archive outlook emails without knowing outlook backup steps. The tool gave me everything I needed without even asking. The user interface of the tool guided me from the installation till the end result. I would highly suggest this tool to everyone else.”- Jason Geller
Computer Processor: 1 GHz or Higher
Computer Memory: 2 GB or More
Internet Connection: Cable or DSL
Mac- MacOS X- 10.10 and above
Windows- Windows 8 and Above
The Mail backup X has been given 5 star ratings from top professionals. Even normal users have given it a 100% approval rate based on its performance and results.
The Mail backup X comes with a set of exciting packages carefully designed according to the needs of different users
The personal edition of the tool allows you to work on two computers with a single license. It is meant for single users and is available for both mac and windows. The single edition can backup 5 mail profiles. You can increase the Mail profiles up to 10 with an easy top up pack. You also get free support and updates for a year.
The team edition works for multiple users and is perfect for teams. You can get this version for 5 to 30 users in different packages. You can backup up to 5 mail profiles per user. If you want, you can get extra 10 mail profiles with an affordable top up. The tool also offers free support and maintenance for a year.
The free trial of the Mail backup X is now here for download. You can test the free trial and see how it works. Once you think it works well for you, you can upgrade to the full version in the package of your choice.
To download right now, click here.