X

Knowing the right way to backup Office 365 mails is essential if you want a concrete way to safeguard email data from loss. It helps you overcome accessibility issues related to mailbox data due to any reason by giving you access to exact copies. The benefits of comprehensive Office 365 email backups are immense. This article equips you with the best way to backup emails not only from Office 365 but from several important email clients and platforms.
Let us find out the best way to backup email from Office 365 with an automatic method
The way forward is either getting the paid version straight away or trying a free demo for Mail backup X. Try the demo to find out more about the tool! Get it right here.
There are two ways to backup emails from Office 365. The first is the well-trodden and tried path of manual backup which has become unsuitable for the modern times because of its many challenges, numerous limitations, and chances of imperfect outcomes. Yet, it is important to explore it here for the users as clarity is important.
This is how to manually backup email from Office 365 with the Outlook application
Step 1: launch the Outlook application on your screen to start.
Step 2: go to File. Now click on Open & Export. Then click on Import/Export.
Step 3: this will cause a pop up window to open. This window will have various options. Click on Export to a file.
After this hit Next.
Step 4: now click on Outlook data file (.PST) from the options shown on your screen. Then click on Next.
Step 5: in the next step, the user will be asked to select the email folder they want to backup. After choosing it click on next.
Step 6: now the user is asked to choose the location where they want to store Office 365 backup file. Choose the location followed by naming the backup. After doing this click on the finish button.
The email backup file gets stored as a PST file in the location specified by the user.
These were the steps to backup Office 365 emails manually using the Outlook method. There are many problems in using this method for users who want regular backups and want granular backups which are easily accessible and searchable. Manual methods don’t give easy to view and search files. Lack of automation and inability to schedule backups does not let one have the assurance of zero data loss in case of any such event. A lot of data elements may go missing, folder hierarchy may change, and some folders may not get included. Backing up larger files might also bring other tasks to a halt as the device gets strained.


Download and install Mail backup X tool: a light tool for seamless email backups
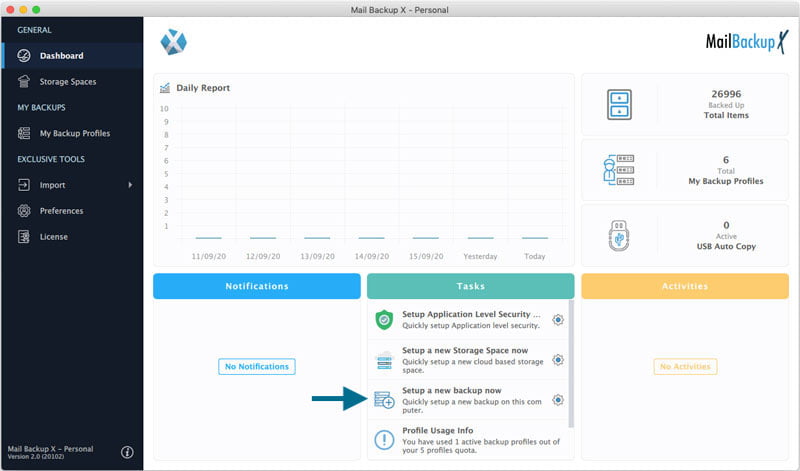
Step 1: Launch Mail backup X tool by double clicking on the tool icon
Step 2: You will find yourself on the first window where the tool allows you to setup a new backup profile. Click on this option to setup a new backup profile and go ahead to the next step.
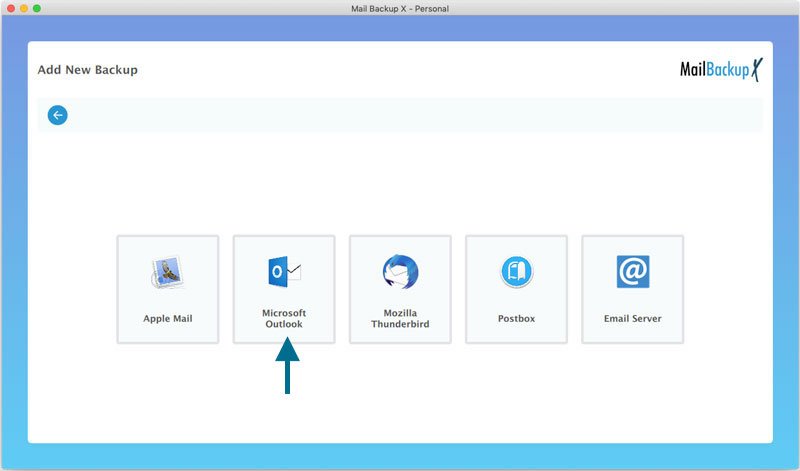
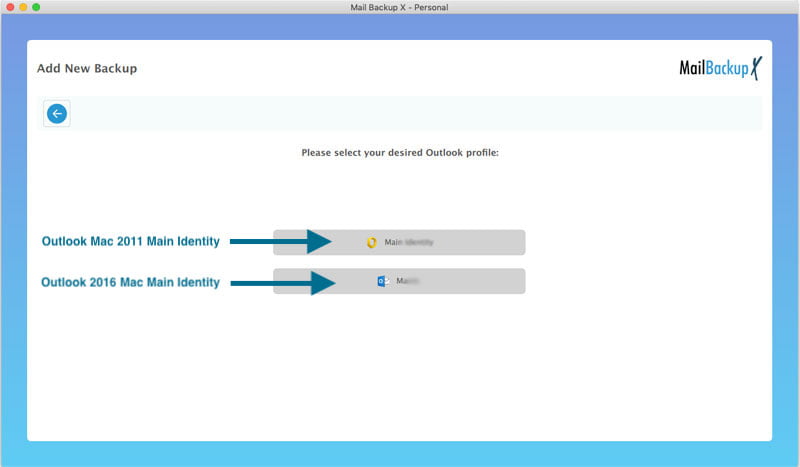
Step 3: You will be taken to the next window where you will be shown different email services that you can backup with this Office 365 email backup tool. You have to choose Outlook from these options. Once you have chosen this, the tool will automatically detect any identity folders and show you your email contents in the next step.
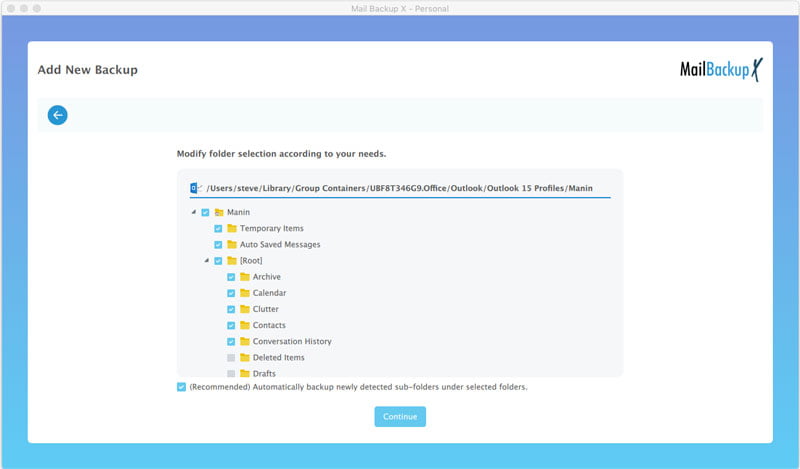
Step 4: In this step, the tool will bring you to a window where you are shown all the contents of the mailboxes corresponding to the email service that you have chosen. You will be able to clearly see all the folders and files that are within your email mailboxes. You can choose the ones that you want to backup. This is the selective email migration feature of this tool. Once you have chosen the folders that you want to backup, click on continue. You can also ignore all empty folders with a single file. This is to ensure that there is no clutter in your backed up mailboxes. Once you click on continue, you will be taken to the next step.
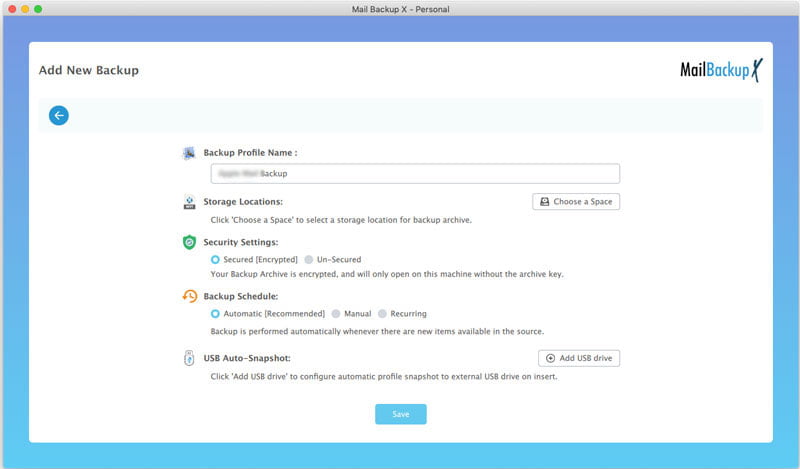
Step 5: This is the most important step where you are given the choice of customizing your backup according to your own requirements.
On this window, you can set up the frequency of the backups. It is suggested to choose the automatic settings for automatic incremental backups which ensure that each email that arrives gets backed up automatically.
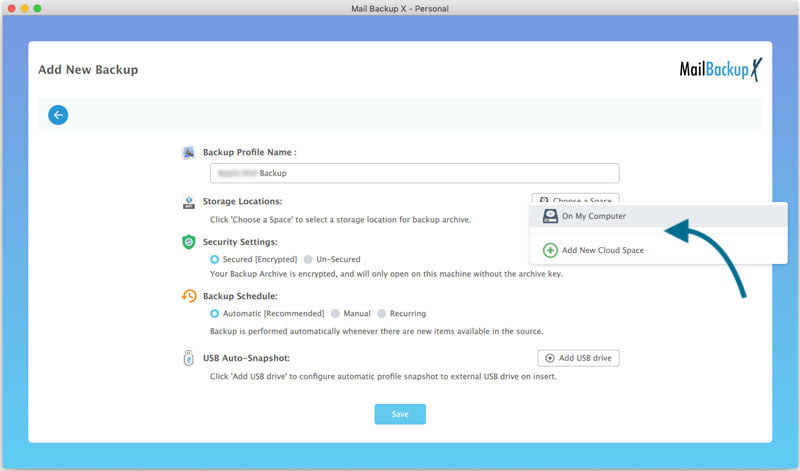
You can also choose the location where you want to store the backup files. You are given the choice to store the Office 365 email backup on your computer or either on your chosen cloud storage service. Currently, Mail backup X works with Google Drive, OneDrive and Dropbox.
You can also setup automatic USB snapshot backups of your Office 365 mailboxes. You need to map a particular USB device which you can map with this feature. Once you are done with it, you just need to plug in the USB drive and the tool will automatically sync and store the latest snapshot copy of your office 365 email backup.
Once you are done with making the necessary changes, click on save.
Step 6: Your backup will have started by now. You can check the live progress of the backup under the activities section of the dashboard. You can also see any critical alerts or notifications right here. You will be able to download a detailed log report of the backup on this dashboard. You can switch to any task from here without interrupting the whole process.
This was the entire Office 365 email backup process with Mail backup X tool.
Offline backup: get secure and accessible storage without internet dependency with this feature. Robust offline 365 mail backup options are provided to the users. They can store email data securely on local drives and external USB drives. A comprehensive control is gained over data storage to protect important email data from loss. This data can be accessed without an internet connection. This benefits individuals and businesses with instant retrieval of emails without relying on third-party servers. The 3X compression feature further helps minimise time to restore this data.
Online backup: gives secure and remote access with Cloud integration to the users expanding the data restoration options. Mail Backup X supports storin g email archives on trusted cloud services. The services that it supports are P Cloud, One Drive, Dropbox, and Google Drive. You can store your data for online access to any of these services you are subscribed to. Online email backups give remote access to the users and the 3X data compression benefits users with faster uploads and downloads.
Most tools restrict users to a single storage option and they don’t have optimisation features. This five star rated certified tool allows a hybrid backup approach which is best for added and essential data redundancy for the present times. As there are features like end-to-end encryption, scheduled automation, and 3X data compression, safety and efficiency are also ensured.
Try a free demo to explore further.
“I have never before used a professional tool that is as versatile yet as easy to use as Mail Backup X. It is unbelievably easy to use this tool which is so swift and has direct steps. Managing multiple mailboxes is a breeze with this tool. Backing up Office 365 emails has now become an effortless task that runs as scheduled. Everyone who uses emails should try this software”
“I have been able to backup even a large mailbox easily with Mail Backup X. The first time using it was a complete surprise as it was so easy and even folder hierarchy was preserved. I am used to its brilliance now which is why I recommend this email backup and recovery tool to everyone serious about data preservation and workflow continuity.”
When was the last time someone gave you a treasured thing for free without expecting anything in return? Have you given your professional services free to someone else? Then what makes you believe that an Office 365 backup tool worth real value would be free? What you get free are substandard tools with plenty of problems including risks like data theft and data loss. With Mail Backup X so easily accessible and with affordable licenses, you don’t have to even spend a significant amount to get the best professional tool.
A lot differentiates Mail Backup X from other tools that backup Office 365 emails beginning with cross platform compatibility, capability to backup as well as restore several email services, prime features, and affordability. So many brilliant features like PDF archiving, remote backups, portable backups, support for FTP server, filter item, and others ensure that this tool is enough for anyone to manage their emails easily and safely.
There are many differences between the manual and automatic processes and these make all the difference to the end results as well as what happens in between. Manual email backup process for any client has restrictions on the file size, the type of backup which can be carried out, locations which can be used, and other things. These methods are specific for only one type of task and mostly for a single email service. Manual effort required, repetition needed, and slow speeds also impact productivity.
By automatically backing up Office 365 mails with professional tools users are saving their time as well as efforts. The users are also gifting themselves a robust solution to backup when, where, and as they need with advanced tools. There can’t be wrong steps and errors with tools like Mail Backup X. Both performance and security are many notches better.
This is one of the most important features in this email box backup software. It is this very feature that ensures that poor connectivity or zero connectivity do not cause you any stress as email backups will remain unharmed. The feature causes the tool to pause the backup when a network issue is sensed. The task will resume only when the network will become stable and it will start right from where it was paused. No time or space is wasted here as the process does not restart but rather resumes smartly.
Yes, users can get a version of Mail Backup X for free. This is the 15-day use demo version which comes with unlocked features for all the right reasons. It is because of this fact only that users get to see the true performance, usage easy and accessibility. This demo can be tried without spending even a single penny. You can upgrade to the full paid version at any point before the trial finishes or after it finishes.
This is something which can happen to anyone. Data loss and downtimes can be very easily avoided in these scenarios with this Office 365 backup and restore software which also gives options to the users for Cloud based and USB backups. You will be able to help yourself by restoring data from these locations if you save multiple backup copies before such an event happens. This can happen even if you have a remote backup or a USB backup. This is the reason one should always have at least 3 copies of email backups and use different storage sites.
The user interface of Mail Backup X is what makes it the tool that it is and lets every user benefit the most from it. Its key aspects include that it is designed in such a way that users with or without experience find it trouble-free and intuitive. The dashboard stands out for easy navigation that enables users to run different tasks like backing up 365 emails, restoring emails, or migrating emails in an easy manner. Step-by-step guidance helps immensely. Try a free demo to verify each point on your own to remove all doubts.
Yes, you can schedule Office 365 mail backups with this tool. You can easily prevent email data loss with this option as emails are backed up automatically. The tool offers you many options for flexibility and customisation.
The tool offers mainly two different editions with further options under the Business edition for teams.
Now that it is clear how to backup email from Office 365 for best and safe outcomes, it is time for the users to get their required edition. This is an easy to make choice with packages having so many perks along with affordable rates. It further comes with a 30-day refund policy if the tool doesn’t do the job for you. With such brilliant features and transparent policies, a user can no longer feel any fear in using this certified tool.
But the best tool cannot come without a demo. As expected this tool has a demo that is absolutely FREE. You can try it up to 15 days and then upgrade directly to the full paid version as soon as you feel confident about your choice. You have to pay nothing to try this free demo.