X


Apple Mail has been the standard Mac Mail client since the early days of OS X. It is versatile and functional, helping users stay organized and manage their email with a seamless experience.
Apple Mail and many other email clients save data locally on your Mac. This is a useful feature, but when something goes wrong you may find that hundreds or even thousands of valuable emails are missing. Mail Backup X can help you recover those valuable personal or work emails in a few simple steps.
If you have Time Machine configured to backup your Mac files, you can use the backups to restore apple email app.
If you use Time Machine to back up files from your Mac, you can easily recover lost items or recover old versions of files. You can use Time Machine from many apps.
You can restore Apple emails to an external hard drive by exporting your emails from the mailbox to the local system. Therefore, to transfer the mailbox from the Apple Mail account, follow the steps below:
If you want to export the same mailbox after it is re-populated with new messages, The Mail does not overwrite the first exported MBOX file but creates a new one.
But this manual method to restore Apple mail files on an external hard drive has many limitations, such as the mailbox that was transferred does not erase all its contents. that is, after exporting, you should get rid of emails to create space in your account. This method also does not provide any warranty to fully store your data without any loss. Exported data may lack integrity.
The manual solution explained above does not ensure an error-free backup and moves Apple Mail to the external hard drive. Therefore, we have developed software called Mail Backup X, which can backup all your emails from your Mac Mail Account and save those MBOX files in PST, EML, PDF, HTML format locally. It is the best restore Apple email solution that allows you to copy / Store Apple Mail on an external hard drive. This backup Apple email tool has many other features that attract Mac Mail users who need to restore Apple Mailbox. This tool can retain email properties even after conversion. In addition, you can move multiple Mac MBOX files at once from your server.
In order to restore Apple email folders, you need to have a backup of your Apple mail email service. If you don’t have a backup in advance, it is necessary to create one. Let us get started and find out how to backup and restore Apple mail emails.
You just have to download and install Mail backup X application. It is the best way to restore Apple mail
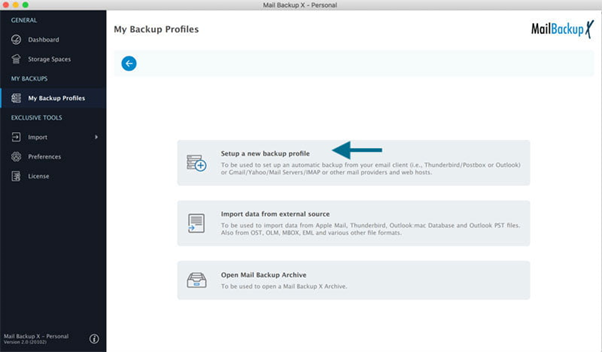
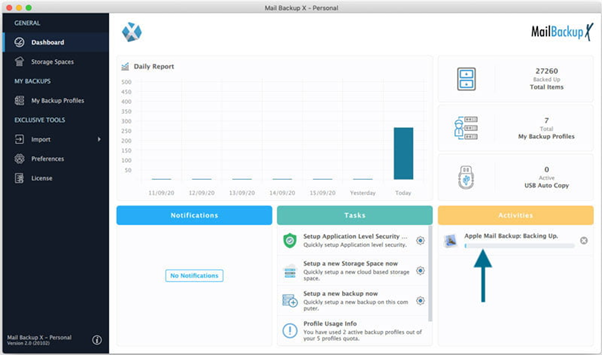
Launch the tool and setup a new backup profile. You will find this on the first window as you launch the dashboard.
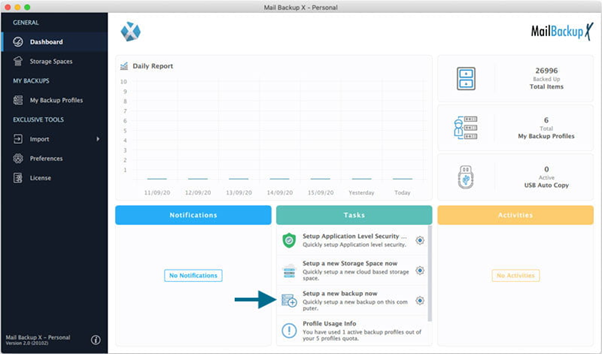
If you have set up backup profiles in the past, you can find this option under the tasks section.
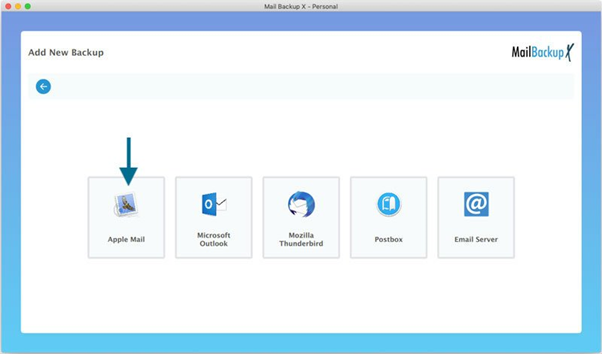
You will be given several options to choose from. These are the email services that you can backup with Mail backup X tool. Select “Apple mail”
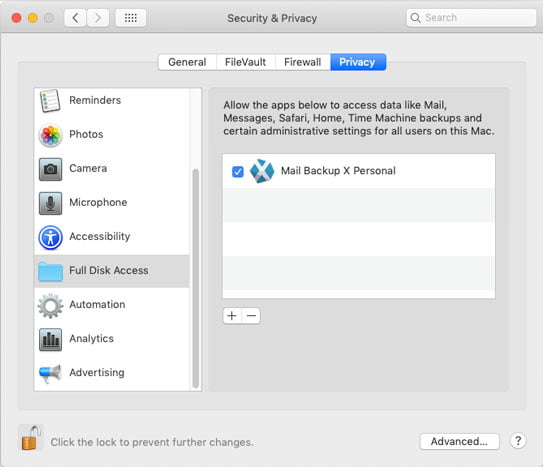
Note: If you are using macOS Mojave and above versions, you might get an error. This error will state “Disk access denied”. If you have allowed disk access while installing the tool, you will not get this error and the process will go on as intended.
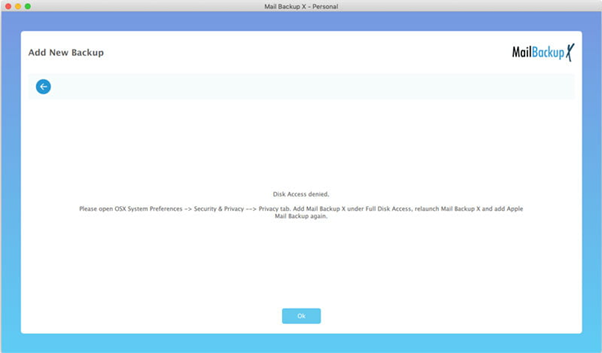
This error can be fixed without much effort. Just close Mail backup X application. Open macOS X system preferences and go to Security and privacy. Under the Privacy setting, find “Full disk access” and add Mail backup X to the list of services/apps which are allowed the disk access. Once this is done, the error should get resolved.
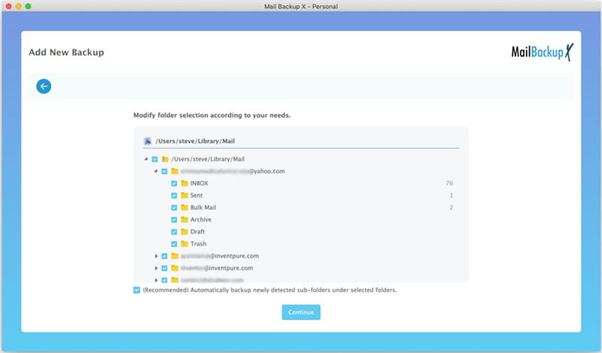
You will be shown the complete folder structure of your Mac mail email mailboxes. The tool will scan all your emails and bring to you, all the folders in a neat and organized manner. You just have to select the folder that you want if you wish to have selective email backup. It is suggested to choose the automatically recommended settings that this restore Apple email tool offers so that you get the perfect results like the developers intended to offer.
Click on continue.
Now you are at the most important Window where you get to customize the backup according to your backup and archiving needs.
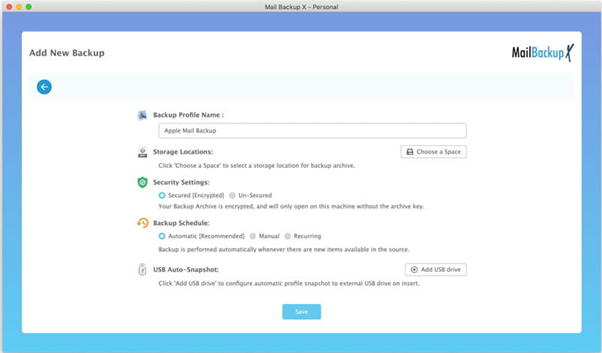
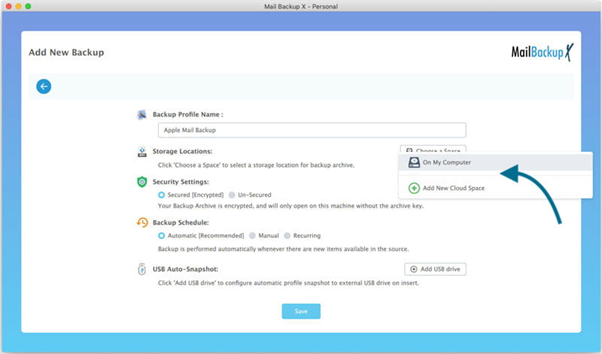
You can then choose the storage location for the Apple mail backup. The tool offers you to add your own cloud service storage as the destination to store the backup. Currently the tool works with OneDrive, DropBox and Google Drive. You can also store the backup on your local device or a hard drive. Once you are done customizing the settings, click on Save.
Your Apple email backup will be exported to the location of your choice. You can check the progress of the backup in the dashboard under the Activities section. You can also see the location of the backup under “my backup profiles” section.
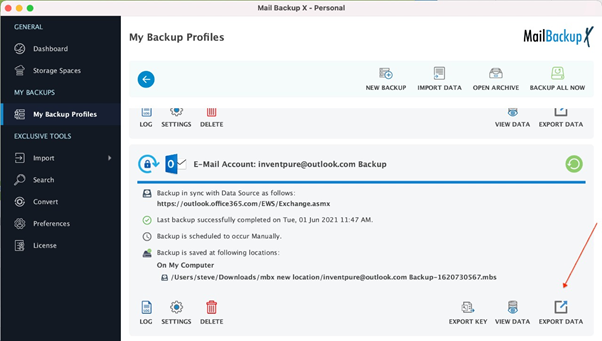
Now as we want to restore Apple mail emails, we are going to go to the “My backup profiles” section. Under this, you are going to see your backup profiles. In order to export your backup profile, click on “Export data” option which is located at the bottom right of the window.
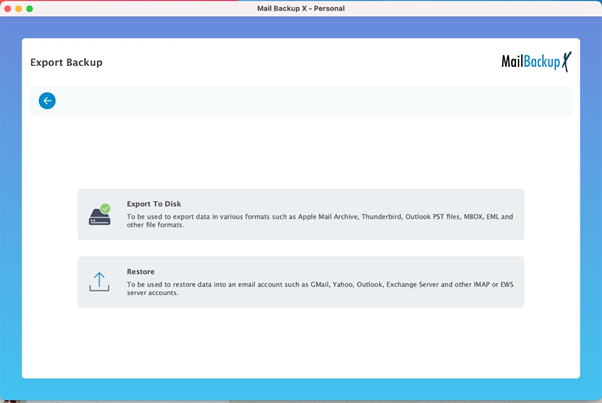
You will then come to another window where you can archive the Apple mail mailbox data. Click on Export to Disk option and choose Apple mail. Choose the folders that you want to export and store them in your preferred location.
Step 1: Launch your Apple mail application.
Step 2: Go to the Application menu and go to File
Step 3: Click on “Import Mailboxes”
Step 4: Choose “Apple mail” and click on continue
Step 5: Now select the location where you have stored the exported Apple mail backup. You just need to locate the folder which you just used to store the Apple mail backup. Click on choose button once you are done.
Step 6: Apple mail will then scan that folder and show you the list of all email folders located within that backup. Click on continue and the files will start importing to your Apple mail.
Now you can find this backup data in your active mac mail mailbox under “On my mac” section.
This is the complete process of how to restore Apple mail emails with a professional apple mail restore solution.
We do not take a shortcut and create a Java application that can run on many platforms. Instead, we wanted to create a product that felt well integrated with the Mac. So we created Apple’s email backup software for Mac using Apple Xcode and placed the controls in the system settings using a native interface. No matter if you are operating macOS 10.8 or higher, the Online Backup Service Mail Backup X will work for both.
We hate the use of software that slows down our computer, so we wanted to be sensitive to the impact on computer performance. We did a lot of amazing magic to optimize the software, including: read data once, slowly scan the drive and wait a few minutes before making a backup at the start time. The result is that Mail Backup X uses less than 1% of its CPU and average memory. Mail Backup X does not install any controller and opens the files from which you back up as read-only to keep your computer stable. Mail Backup X also works very well in parallel with Apple Time Machine for greater security.
All online backup programs say they’re easy to use. It’s almost become a cliché. But in Mail Backup X we really wanted that to be true from start to finish. An example is the installation experience. By adopting a similar approach to Time Machine and make a backup of all user data, Mail Backup X does not have to ask the user to choose a lot of types of files and browse to locate the folders you want to backup. Most users do not know where they store their projects or where their email is stored. Also, we didn’t want users to remember to come back and edit their backup list every time they create a new folder. Sure some additional things will be supported, but the ease of use and peace of mind are worth the effort. We wanted a user to download and install Mail Backup X and back up the data in less than a minute. Mac’s backup has never really been that easy or better.
Have you ever been bothered to make a copy of your data on USB laptops and remember which folder you backed up the data to? We know how stressful and slow the process is, which is why Mail Backup X has an integrated USB backup synchronization function, where it is only configured once and a USB drive is assigned to copy a backup. In later attempts, Mail Backup X is smart enough to detect and notice when the drive is connected and where to copy the data into that drive.
With the FTP client integrated, you can set up backup primary mail or mirror for increased security to load on a network server. This feature is really useful for any company’s IT technicians, as it is comforting to know that all of your users ‘ data is also uploaded to a secure FTP server from time to time and you have control every time a restoration is required.
The tool is offered in two versions for different types of users. All users can choose their preferred version.
The single user license of the tool allows you to backup five mail profiles. It can be installed on two computers. You can install it on both mac and windows operating system. It is ideal for single users who want to take control of their email data without getting too much into technicalities. It is compatible with both mac and windows OS.
The team version of the tool is perfect for both small and large teams. You can opt for packages built for 5, 10, 20, 30 users or more. You can even get your own customized enterprise version. The team version lets you backup up to 5 mail profiles per user. It is compatible with both mac and windows.
Computer Processor: 1 GHz or Higher
Computer Memory: 2 GB or More
Internet Connection: Cable or DSL
macOS X (10.13 and above)
Ready for macOS Monterey & Mac M1
Windows 8 and above
Paul Smith :- “I was tired of losing my emails with free tools. I wanted a new solution that I could trust. I stumbled across Mail backup X since I had almost run out of hope. The tool is truly professional and loaded with a bunch of unique features which enhance the quality of results. I was impressed with what this tool offered to me at such an affordable cost. I can also use this tool as an email converter when I want. On top of this, I get a guarantee of no data loss.” – Arthur Newman
Melisa Dönge :- l“Tired of testing a different tool every day, I had almost given up on the prospect of getting my email backup restored. I wanted to backup and restore my emails according to my preference. Most of the tools that I tried wanted me to restore the entire mailbox at once. It was Mail backup X by InventPure which gave me complete freedom to backup and restore my emails like I wanted. I am able to customize my emails any way I want. I would certainly recommend you to try it at least once.” – Bryce Gilligan
Does Mail Backup X offer a search feature?
Yes, Mail backup X offers a dedicated search feature which allows you to find any emails you want from your archives or backup profile data. This search feature also works like an extra layer of security. Just enter any search item related to the emails you want to find and the tool will find them for you instantly.
What can I do to choose my preferred storage?
If you want to choose your preferred storage, you have to wait till you get to the advanced settings window during the backup process. Once you are on the advanced settings window, you have to click on Choose a space. Then you can select the location you want. You can store the backup either online or offline like you want. This tool supports Google drive, OneDrive, Dropbox, P cloud and more.
What does the team version of this tool offer to its users?
The team version is brilliantly curated to work for a larger number of users. You can choose your package for 5, 10, 20, 30 users or more depending on your requirement. The team version is compatible with both windows and macOS. You can backup up to 5 mail profiles per user with the team version. You can also choose to upgrade your team version with a top up pack which gives you 10 more mail profiles to work with. The team version admin can also manage backups for other users.
What are the formats I can view or import?
The tool is made to be compatible with different email services so that you can manage everything under a single interface. You view, import and restore different formats like OLM, PST, MBOX, RGE, EML and more. This gives you the power to work with data from email services which you haven’t even used before.
What are the email services that I can backup with this tool?
You can backup and restore different email services with this tool. Some of those email services are Windows outlook, mac Outlook, Apple mail, Gmail, Yahoo mail, Office 365, Thunderbird, Postbox and other major email services. Apart from these, this tool can also backup all IMAP based email services. This is highly beneficial for all email users who want comprehensiveness in their work.
Where does the restored email data go?
The restored email data goes wherever you want it to go. This tool comes with a modern and useful feature which allows you to restore your emails to your chosen live mailbox. You don’t have to keep guessing where your restored email data went. You have total control over everything that this tool does.
What makes the results specific and accurate?
The fact that you get to modify the backup completely according to the results that you want, makes the results very specific. This is a professional tool so there is no question about accuracy. You can choose what gets backed up and restored. You also get to choose where it is stored and when it is backed up.
How do I ensure that this tool does what it says?
If you want to ensure that this tool does what it says, you should certainly try the free trial. The company offers a 15-day trial where you can test all the features of this tool without worry. The free trial lets you perform backup and recovery so that you can really make sure that it does what it says. You can also upgrade to the full version directly from the free trial.
Can I use this tool on an older version of windows?
This tool works on windows 8 and above.
What does the top up offer?
The tool graciously offers a top up pack which boosts the over all effectiveness for the user. You can easily get a top up which gives you 10 more mail profiles to work with. This top up works great for single users and team users. If you are the admin of the team license, you can assign these new email profiles to any user you want.
The free demo version of the tool is offered to all users so that they can really find out how each feature of this tool works. It is extremely important for all users to understand what they are getting into. The free trial of the tool has been designed to give you access to all the features for 15 days. Nothing is kept hidden from the user. Once you have tested the tool fully, you can go ahead and get the full version of the tool in the package of your choice. You should certainly check out this tool because it offers you the best results at the most affordable rates. Test the tool and buy your preferred package from the link given here –